Saturday, November 20, 2010

Fake Thanksgiving 2010

Back in August, Hubby's sister L got engaged and moved to North Dakota with her fiance, S.  He's a teacher and found a job there for this school year.  Obviously we don't see L & S very often now, so it's exciting when they come back to visit.  In mid-November Hubby's sisters L & M, and his brother R, are going to Europe for 2 weeks.  This means that they'll be gone for Thanksgiving, and with E & C living in Virginia we will be the only ones around for Thanksgiving this year.  L is coming in to PA a few days before going to Europe, so we've decided that we'll have fake Thanksgiving with everyone 2 weeks before the actual holiday.  

I offered to make something for dinner and Hubby's mom asked for a couple of pumpkin pies.  Easy enough.  But I couldn't leave it at that, so I went in search of a pumpkin pie that was a little bit different (last time we were in PA for Thanksgiving I made a 4-layer Pumpkin Cake).  So while I made two regular pumpkin pies using the classic Libby recipe, I also made a Streusel-Topped Pumpkin Pie, from Pillsbury's website.I ended up using the frozen deep-dish crust from Pillsbury that comes in the aluminum tin, all you have to do is fill.  This was easier for me because I am not entirely sure where all of my pie plates are packed...  I also omitted the orange zest from the topping because we didn't have any.  

The pie tasted great and I was glad I made it the night before, because sitting in the fridge overnight seemed to make the topping yummy.  It tasted like it held a lot of the moisture into the filling, which made the pumpkin taste really creamy.  I plan to make this again for real Thanksgiving, and I'm going to use more brown sugar and a little more butter in the topping so that the pie has more of the baked crumbly goodness on top.


Streusel-Topped Pumpkin Pie
originally from the Pillsbury website
serves 8

Filling
1 can pure pumpkin (15 oz)
1 can evaporated milk (12 oz)
1/2 cup sugar
2 eggs, slightly beaten
1 1/2 tsp pumpkin pie spice
1/4 tsp salt

Streusel Topping
1/4 cup packed light brown sugar
2 tbsp AP flour
2 tbsp butter or margarine, softened
1/2 cup chopped pecans


Preheat oven to 425.  If using refrigerated pie crust, unroll into a 9-inch glass pie plate.  If using the frozen crusts in the tin, keep them in the freezer until you're ready with your filling.

In a large bowl, mix the ingredients for the filling until well-blended.  Pour into the crust-lined pie plate.

Bake 15 minutes at 425, then lower the temperature to 350 and bake for another 15 minutes.  While the pie is baking, mix the streusel ingredients in a small bowl.

Sprinkle streusel over pumpkin filling.  Bake for another 15-20 minutes or until a knife inserted near the center comes out clean.  Cool completely, about 1 hour.  Serve with whipped cream or Cool Whip.


Saturday, November 13, 2010

The Great Pumpkin Cake

So I started this post on November 3rd, a perfectly reasonable amount of time after I actually made this cake.  Life is overtaking me!

On Halloween we headed to Hubby's parents' house for Sunday dinner.  His brother and sister-in-law were visiting from Virginia for the weekend and we hadn't seen them in a few months so we decided to make the trip for a few hours.  We hadn't done a family Sunday dinner in a very long time!  It was a great meal and so nice to see everyone.

I am on the Kraft recipes mailing list and received an e-mail on Friday night with Halloween recipes, and as soon as I saw the Great Pumpkin Cake I knew I had to make it for Sunday's dinner.  I had bookmarked this cake a long time ago but never made it, so this was a great reminder.  I later realized how awesome it is that I've gotten to a point in my cake decorating career that something like this is easy peasy for me and is something I can "whip up" on short notice.  I immediately had Hubby text his mom to tell her I would take care of dessert.  Kraft indicates "any cake flavor" for this recipe, so I searched their website for a good-looking pumpkin cake and used that.  I forgot to put in the chocolate chunks, but oh well.  It was still tasty!

Great Pumpkin Cake
originally from Kraft website for design and cake recipe
serves 16

Cake
1 pkg spice cake mix
1/2 cup water
1/2 cup oil -- I always substitute unsweetened applesauce for oil
4 oz (1/2 bar) low-fat cream cheese 
1 cup canned pumpkin
1 tsp ground cinnamon
1/2 tsp ground ginger
6 squares semi-sweet chocolate, coarsely chopped

Frosting
8 oz (1 bar) low-fat cream cheese
1/4 cup (1/2 stick) softened butter -- I always use unsalted butter when baking
4 cups powdered sugar
Red & Yellow Food Coloring -- I used liquid but you could also use paste
1 Comet Ice Cream Cone


Preheat oven to 350°F.  Prepare cake mix as directed on package, adding only the water and oil (or unsweetened applesauce).  Add the cream cheese, pumpkin, cinnamon, and ginger.  Beat on medium speed until well blended.  Stir in chopped chocolate.  Pour into greased 12-cup fluted tube pan or 10-inch tube pan. 

Bake 40 to 45 min. or until toothpick inserted in center comes out clean.  Cool 10 min.  Remove from pan; cool completely on wire rack. 

For the icing, beat cream cheese and butter in medium bowl with mixer on medium speed until well blended.  Gradually add sugar, beating until well blended after each addition. Remove 1/2 cup of the frosting; place in small bowl.  Add green food coloring; stir until well blended.  Spread half of the green frosting onto outside of ice cream cone; set aside.  Cover and reserve remaining green frosting for later use. 

Add red and yellow food colorings to remaining white frosting to tint it orange.  Spread onto cake to resemble pumpkin.  Invert ice cream cone in hole in top of cake for the pumpkin's stem.  Pipe the reserved green frosting in vertical lines down side of cake.


Monday, November 1, 2010

Pièce de résistance - part 2

Now, what I know you've been waiting for!

For L's bridal shower cake I made a 2-layer 9x13 marble cake with chocolate buttercream frosting.  These were two firsts for me, as all my cakes up to this point were 8-inch rounds with white buttercream.  I used yellow icing for the border and for the writing, and the gum paste flowers from Shop Bakers Nook.

Unfortunately I don't have any pre-decorated photos because at this point it was closing in on midnight and I just wanted to make sure I got it all done. 


The flower placement was definitely one of the more intensive pieces.  I was
very picky!  I love the date written around the curve of the petal.


On display at the shower, with cupcake placements.


Saturday, October 30, 2010

Pièce de résistance - part 1

Hands down the most exciting cake I've done so far was for my friend L's bridal shower.  L is the now-wife of my husband's friend A, and sister-in-law of my friend J.  (I'm noticing now it seems like we only hang out with these few people, but I swear we have a lot more friends than this.)

In late July I was contacted by A's mom and L's mom, asking me if I would make the cake for L's bridal shower at the end of August.  I couldn't believe that someone would ask me to decorate a cake for such a big occasion.  I happily accepted and started to plan out what I would make.  As I browsed the internet I came across gorgeous gum paste flowers from a website called Shop Bakers Nook in red, yellow, and white that looked just like the flowers from L's bridal shower invitation, so I decided that I would make a marble cake decorated to mimic the invitation.  In addition I would make Funfetti cupcakes so that L would have both at her shower (her favorites!).  Because this was such a big job, I'm splitting this into two posts to cover cupcakes and then the cake.

I took off from work the day before the shower so I'd have time to bake.  The weekend before the shower, Hubby and I were in Philadelphia for a wedding.  The week of the shower I was in NYC a few days for work.  I made a few batches of cupcakes the night I got home from NYC, and then the day I took off from work I baked from 9:00 a.m. through 1:30 a.m.  It was epic!  It wasn't easy by any means, and I'm very lucky that I have such a helpful and supportive husband who is willing to sprinkle colored sugar and sugar pearls onto about 6 dozen cupcakes as I iced.  We got everything done and I was so happy with what we brought.

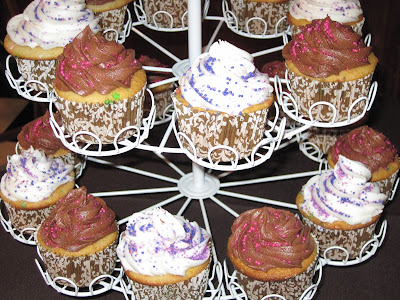
Here is a look at a portion of my cupcake count.  I made about 2 dozen regular-sized and 4 dozen minis.  I had great paper liners I was excited to use, but I have to admit these pups were everywhere - kitchen table, counter, coffee table, etc. 


Below is my finished cupcake product.  When frosting I used a basic Wilton 1M tip.  This is by far the easiest way to knock out a bunch of cupcakes quickly while still ending up with a pretty final product.  I decided to do vanilla and chocolate icing to stick with the bride and groom theme; the chocolate icing had pink sprinkles and the white icing had purple sprinkles.


The cupcake stand is from the Martha Stewart line, found at Macy's for $20.  I was really happy with this cupcake tree because it's versatile - white, pretty, simple, and doesn't take up too much room. 


Tune in to the next post to see the cake!

Thursday, October 21, 2010

Father's Day in Deep Creek - June 2010

Every year my husband and I go to Deep Creek Lake in Maryland for a week with his family.  Even though it's only immediate family, it seems like we're increasing in number by the year.  There are six kids to start with, and 4 of the 6 have significant others that come along.  Then two of those four have one kid each.  This brings us to a total of 14 people in one house on the lake for a week.  Contrary to how it might sound, it's actually pretty fun.  And each of those two couples is currently pregnant with their second baby, so we'll be up to 16 people next year.  We may eventually have to do two separate houses!

Because we're vacationing with a small army, we can really pack it in when it comes to food.  Everyone brings a load of snacks, cereals, drinks, etc. to throw into the communal pot for the week and each night a different couple takes care of dinner for the whole group.  It's a big task when it's your night, but it's nice to know that you only have to do it once and that you're not going to spend a fortune on eating at restaurants for a week. 

When I was planning for our dinner this year I realized that our second night in Deep Creek was Father's Day, so I jumped at the chance to make that our dinner night.  It was a two-fold benefit - one, we got our night out of the way early and two, I got to decide on a really cool cake to bring for the three fathers in the group.  I spent about a week searching for different designs that were impressive yet realistic for a newbie, and eventually I had a light bulb - make a Steelers cake!  We're all huge fans and it would be fun to practice using piping gel to outline a pattern.  I used the standard white buttercream again, with devil's food cake.  I was really careful coloring the black parts of the icing, and while it wasn't pitch black like I wanted, it was definitely more important to make it edible.  Everyone really liked this cake and it was a great way to end our Father's Day at the lake. 


Tuesday, October 19, 2010

Memorial Day 2010

My first post-class cake was done for Memorial Day 2010.  We were headed to a barbecue in my husband's hometown, hosted at one of his friend's parents' house (this friend, A, also happens to be my friend J's brother).  Since I had just finished the Wilton class I decided to whip something up to take with us.  I used the standard Wilton white buttercream on a red velvet cake (so it was super patriotic once we cut it).  I was a little nuts about the stars not having lined up the way I wanted them to, but that's one of my OCD tendencies I had to ignore.

One of the things I was happy about is that my icing technique keeps getting better.  As I continue to practice, the icing gets smoother and more even, and while my shell border isn't as traditionally tight as I'd like, it's consistent.  It's not always important to do it exactly as you're taught, but as long as you keep it the same within your baked good it's usually no big deal.

For the stars on the top I made light impressions with a cookie cutter and then outlined them in blue icing with a round tip (I can't remember which one).  Then I filled in each star using red icing that I mixed with the no-taste coloring paste from the Wilton line.  When coloring icing it's important to remember that the brighter, more vibrant you want your colors the more paste you have to use, which can result in bitter-tasting frosting.  Luckily Wilton makes a few colors as no-taste.  Then I filled in a few areas of white space with three drop flowers.  The BBQ crowd seemed pleased with it and luckily we didn't have any to bring home.


Saturday, October 16, 2010

I'm off to a great start...

Probably one of the smartest things I've ever done is try to start a blog right before moving into a new house.  I'm a virtual Einstein when it comes to things like that.  How did I not realize that my weeks would become all about packing boxes and moving boxes and unpacking boxes and organizing stuff?  Anyhow, I haven't been able to do much new baking or any other culinary experimentation, but I do have my eye on some things that I hope to try soon.  Now that the functional pieces of my kitchen are (mostly) in-tact and I have my fancy gas stove/oven, I need to jump back in.

Until I do that, I thought it might be a good idea to regale you with some of my cake decorating.  Back in May I took my first cake decorating class with my friend J.  J and I signed up for Course 1 of the famous Wilton classes at our local Michael's store.  Now J is a culinary school grad and her mom has decorated cakes professionally for years now, but my experience was quite limited.  In Course 1 we learned the basics about making icing, filling bags, using the different decorating tips, and the beginner's techniques for decorating (borders, writing, etc.).  Below is a recap of the three cakes I made during this 4-week class, and in the next few posts I'll show you the cakes I made after that (and you'll see I've gotten a lot better).  J and I have been trying to take Course 2 for a few months now, but the instructor never has enough people signed up to actually teach it.  Hopefully it happens soon though.


Week 2 of class - my very first cake! 
My icing technique has gotten MUCH better.


Week 3 - already an improvement! 
I think this might have been my favorite.


Week 4 - the Wilton rose!
I definitely needed help but I think it came out well.


Saturday, September 25, 2010

If I'm going to follow so many food blogs, one of them may as well be my own

I have been following food blogs for a long enough time to know that it can't be easy.  Consistently making the time to try new recipes, remembering to document the process, and then creating a blog post to review the experience are big responsibilities.  However, my loyalty to a few of these blogs (linked to the right) has also provided a lot of inspiration to try new things, and while the culinary photography will likely leave something to be desired, I thought this might be a good way to share the recipes I try with friends and family while still giving myself the opportunity to write.  Two birds, meet this one stone.

Recently I started decorating cakes and since that began, many people have said I should start a blog.  This chatter increased the more I started trying new recipes, both baking and otherwise, and so I'm finally giving in to the peer pressure.  Next let's make plans to jump off a bridge, shall we? 

So in a word, welcome.  I'm going to post about all kinds of culinary endeavors, though baking will probably be a primary focus.  I'm not big on creating my own recipes, so most of what you will see is what I try from searching various sources on the internet.  My final promise here is that when I recap my experience in the blog post, I will try to skip over most of the swearing.  Key word being "try".

P.S. For those of you who know me, you also know that I am a huge Pittsburgh Steelers fan.  Hence the reason I chose the background I did for this blog.  That was not an accident.  I thought you should know.